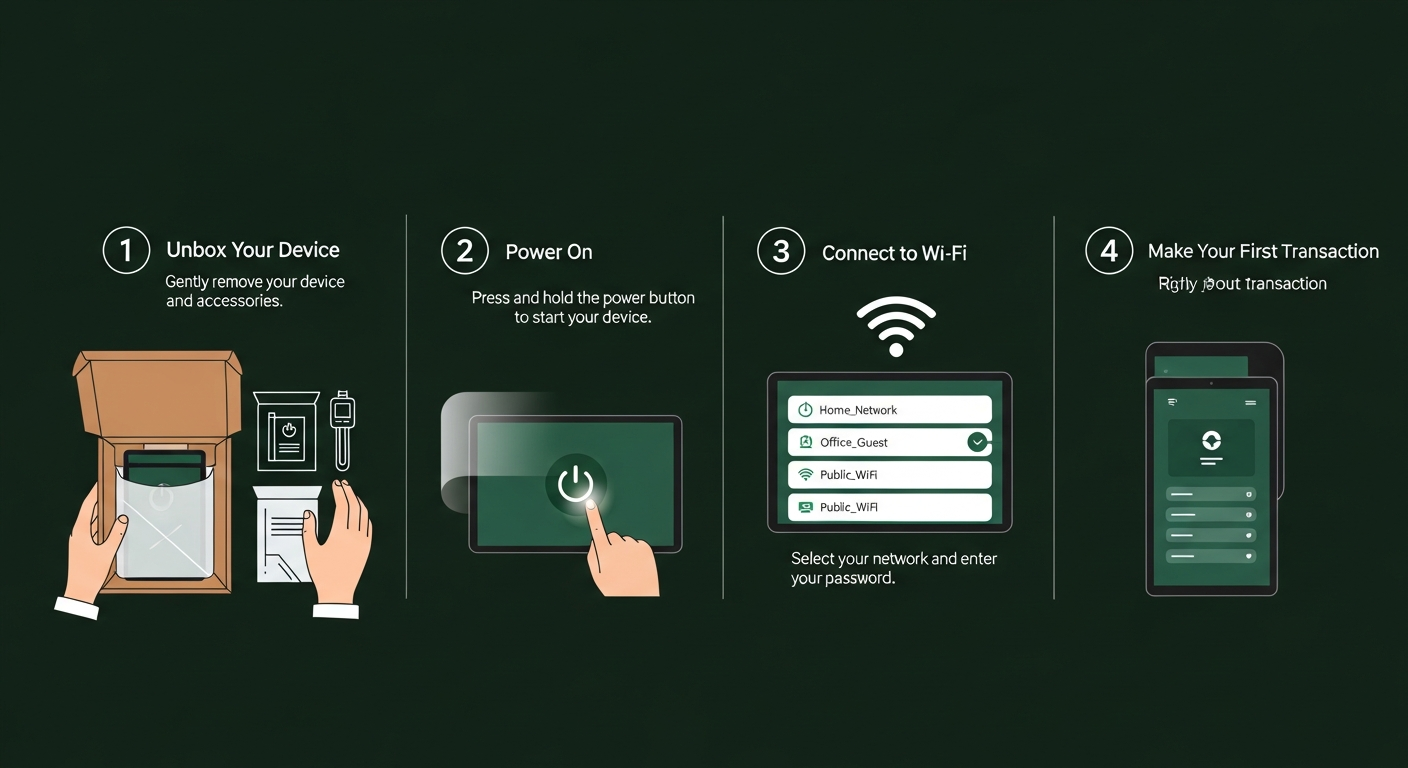
- Step 1: Unbox and inspect your Trezor device for tamper-evident seal integrity
- Step 2: Download and install Trezor Suite from the official website (suite.trezor.io)
- Step 3: Connect your Trezor via USB-C (or Bluetooth for Safe 7) and follow on-screen prompts
- Step 4: Install the latest firmware when prompted by Trezor Suite
- Step 5: Create a new wallet and securely back up your recovery seed phrase
- Step 6: Set a strong PIN code on your device for access protection
- Step 7: Add cryptocurrency accounts and start sending, receiving, and managing your assets
Setting up a Trezor hardware wallet is straightforward and typically takes 15 to 20 minutes from unboxing to your first secured cryptocurrency account. This guide walks you through every step of the process for all Trezor models including the Safe 7, Safe 5, and Safe 3. If you have questions along the way, check our FAQ page for quick answers.
Step 1: Unbox and Inspect Your Device
When your Trezor arrives, carefully inspect the packaging before opening. Every genuine Trezor device ships with a tamper-evident holographic seal on the box. Verify that this seal is intact and undamaged — if it shows signs of tampering, do not use the device and contact Trezor support immediately. Inside the box you will find the Trezor device itself, a USB-C cable (for Safe 3 and Safe 5), getting started documentation, and recovery seed cards for writing down your backup phrase.
The Trezor device itself should have no pre-installed firmware. A genuine new Trezor will prompt you to install firmware during the first setup — if your device already has firmware installed or displays a pre-configured wallet, it may have been tampered with. Always purchase directly from the official Trezor website (trezor.io) or authorized resellers to ensure you receive an authentic, untampered device.
Step 2: Install Trezor Suite
Navigate to suite.trezor.io in your web browser and download the Trezor Suite desktop application for your operating system (Windows, macOS, or Linux). The desktop application is recommended over the web version for enhanced security, as it verifies firmware signatures locally and provides a more controlled environment. Install the application following your operating system’s standard installation process.
Alternatively, you can use the Trezor Suite web application directly at suite.trezor.io without installing anything. The web version provides the same core functionality and connects to your Trezor through the Trezor Bridge browser extension, which facilitates secure communication between your browser and the hardware wallet.
Step 3: Connect Your Device
Open Trezor Suite and connect your Trezor hardware wallet to your computer using the included USB-C cable. For Trezor Safe 7 users, you can alternatively connect via Bluetooth by enabling Bluetooth on your device and following the pairing prompts in Trezor Suite’s mobile application. Trezor Suite will automatically detect your connected device and begin the guided setup process.
If this is a brand-new device, Trezor Suite will recognize that no firmware is installed and prompt you to proceed with firmware installation. If you are setting up a previously used device, you will see options to either create a new wallet or recover an existing one using your recovery seed phrase.
Step 4: Install Firmware
Trezor Suite will prompt you to install the latest firmware on your device. This is a critical security step — firmware updates contain the latest security patches, bug fixes, and feature improvements. Click the install button in Trezor Suite and confirm the installation on your Trezor device’s screen. The process typically takes 1 to 2 minutes and your device will restart automatically when complete.
The firmware installation is verified cryptographically by your Trezor device. Only firmware signed by SatoshiLabs’ official signing keys will be accepted, preventing the installation of unauthorized or malicious firmware. This verification happens independently on the device hardware, ensuring that even a compromised computer cannot install tampered firmware on your Trezor.
Step 5: Create Your Wallet and Back Up Your Recovery Seed
After firmware installation, you will be prompted to create a new wallet. During this process, your Trezor generates a recovery seed phrase — either a standard 12-word or 20-word seed, or a Shamir Backup split into multiple shares (available on Safe 5 and Safe 7). This recovery seed is the master key to all your cryptocurrency accounts and must be backed up immediately and stored with extreme care.
Write down each word of your recovery seed on the provided recovery seed cards, in the exact order displayed on your Trezor’s screen. Double-check every word for accuracy. Never photograph your seed phrase, store it digitally, or enter it into any website or application. Consider using a metal backup solution for fire and water resistance. If using Shamir Backup, distribute your shares across multiple secure locations. For detailed backup strategies, read our comprehensive backup and recovery guide.
Step 6: Set Your PIN
After backing up your recovery seed, you will set a PIN code on your Trezor device. The PIN protects your device from unauthorized physical access — anyone who picks up your Trezor will need to enter the correct PIN before they can view balances or sign transactions. Choose a PIN that is at least 4 digits long (up to 50 digits are supported) and avoid easily guessable sequences like 1234 or your birthday.
The PIN entry screen on Trezor uses a randomized keypad layout that changes with every entry attempt. This means that even if someone observes you entering your PIN or records your screen, the button positions will be different next time, preventing the PIN from being captured through shoulder surfing or screen recording. After 16 incorrect PIN attempts, the device automatically wipes itself, protecting against brute-force attacks.
Step 7: Add Accounts and Start Using Your Trezor
With your wallet created, seed backed up, and PIN set, you are ready to start using your Trezor. In Trezor Suite, click “Add Account” to create cryptocurrency accounts for Bitcoin, Ethereum, and any other supported assets you wish to manage. Each account will generate receiving addresses that you can share with others to receive cryptocurrency, and you can send crypto by entering a destination address and confirming the transaction on your Trezor’s screen.
Trezor Suite provides a complete portfolio dashboard showing your total balance across all accounts, recent transactions, price charts, and account details. You can manage multiple accounts per cryptocurrency, label transactions for your records, and use advanced features like coin control for Bitcoin UTXO management. For enhanced privacy, enable Tor integration in Trezor Suite’s settings to route your connection through the Tor network.
Explore all of Trezor’s capabilities on our features page, or browse our blog for advanced guides covering passphrase wallets, Shamir Backup strategies, and third-party wallet integration.