Setting Up Your Trezor Safe 7: Complete Beginner Guide
A comprehensive walkthrough for setting up your Trezor Safe 7 hardware wallet from unboxing to your first crypto transaction, covering firmware installation, seed backup, and PIN configuration.
The Trezor Safe 7 is the most advanced hardware wallet ever created by SatoshiLabs, combining dual secure element chips, post-quantum cryptography, Bluetooth connectivity, and IP67 water resistance into a sleek, portable device. If you have just received your Safe 7, this comprehensive guide will walk you through every step of the initial setup process, from unboxing to your first cryptocurrency transaction. Whether you are new to hardware wallets or upgrading from an older Trezor model, this guide ensures you configure your device correctly and securely from the very beginning.
Before You Begin: What You Need
Before starting the setup process, make sure you have the following items ready. Your Trezor Safe 7 device (still sealed in its original packaging), a computer with internet access running Windows, macOS, or Linux, the USB-C cable included in the box (or a Bluetooth-enabled mobile device), a pen and the recovery seed cards included in the packaging, and approximately 20 minutes of uninterrupted time in a private setting. The initial setup involves generating your recovery seed phrase, which is the master backup of your entire wallet. You must perform this step in a private location where no one can observe your screen or the words you write down.
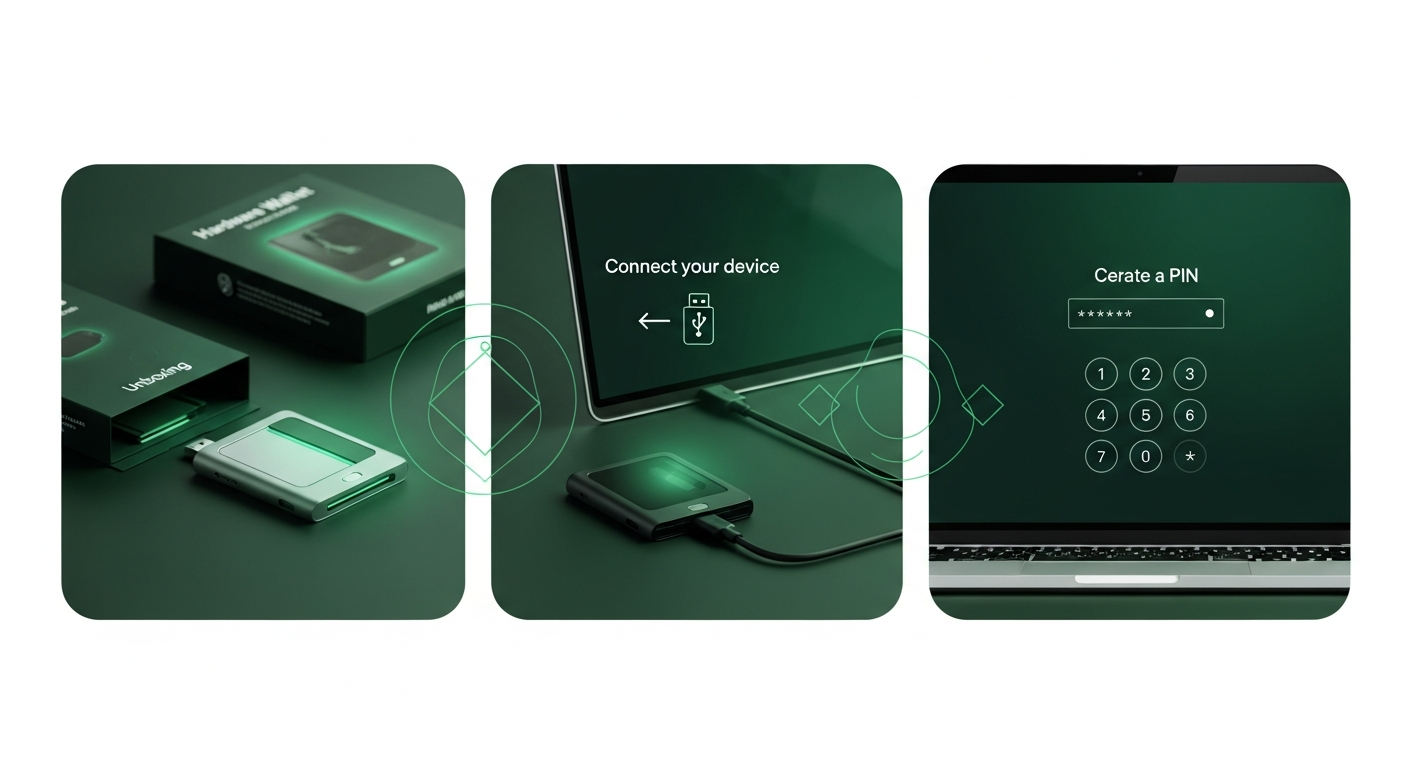
Step 1: Verify the Package Integrity
Trezor takes supply chain security seriously. Every genuine Safe 7 ships with a tamper-evident holographic seal on the outer packaging. Before opening the box, carefully inspect this seal for any signs of damage, peeling, or re-adhesion. The holographic pattern should be intact and clearly visible when tilted under light. If the seal appears compromised in any way, do not proceed with setup. Contact Trezor support immediately and arrange for a replacement device. Additionally, verify that you purchased your Trezor from the official website (trezor.io) or an authorized reseller listed on the Trezor website.
Inside the box, you should find the Trezor Safe 7 device, a USB-C charging cable, a getting started guide, three recovery seed cards, and Trezor stickers. The device itself should be completely blank with no firmware pre-installed. If your device powers on and shows a configured wallet or existing accounts, it has been tampered with and should not be used.
Step 2: Download and Install Trezor Suite
Navigate to suite.trezor.io on your computer and download the Trezor Suite desktop application for your operating system. The desktop version is recommended over the web interface because it provides additional security verification features including local firmware signature checking. Run the installer and follow the standard installation prompts for your operating system. On macOS, drag the Trezor Suite icon to your Applications folder. On Windows, run the installer executable and follow the wizard. On Linux, download the AppImage file, make it executable, and run it.
Once installed, launch Trezor Suite. The application will display a welcome screen guiding you through the device setup process. If this is your first time using Trezor Suite, it may prompt you to install Trezor Bridge, a background service that facilitates secure communication between your browser or application and the hardware device.
Step 3: Connect Your Safe 7
Connect your Trezor Safe 7 to your computer using the included USB-C cable. Alternatively, if you prefer wireless setup, you can pair the Safe 7 with Trezor Suite on your mobile device via Bluetooth 5.2. For the initial setup, a wired USB-C connection is recommended as it provides the most reliable connection for firmware installation and seed generation. Trezor Suite will detect your device and display a prompt indicating that a new device has been found and firmware needs to be installed.
Step 4: Install the Latest Firmware
Trezor Suite will now guide you through firmware installation. Click the install button and confirm the action on your Safe 7’s touchscreen display. The firmware download and installation process typically takes between one and two minutes. During this time, do not disconnect your device or close Trezor Suite. Your Safe 7 will verify the firmware’s cryptographic signature before accepting the installation, ensuring that only authentic SatoshiLabs-signed firmware can run on your device. After successful installation, the device will restart automatically.
Step 5: Create a New Wallet
After firmware installation, Trezor Suite presents you with two options: create a new wallet or recover an existing wallet from a backup seed. Select “Create New Wallet” to generate a fresh set of private keys. On the Safe 7, you will also be asked to choose between a standard single recovery seed and Shamir Backup. Standard backup generates a single 12 or 20-word recovery phrase. Shamir Backup splits your seed into multiple shares using the SLIP-39 standard, which is recommended for higher-value holdings as it eliminates the single point of failure inherent in traditional backup methods.
Step 6: Back Up Your Recovery Seed
This is the most critical step in the entire setup process. Your Trezor Safe 7 will display your recovery seed words one at a time on its touchscreen. Write down each word carefully on the provided recovery seed cards in the exact order shown. After displaying all words, the device will quiz you on several randomly selected words to verify you recorded them correctly. Take your time and double-check every word. A single error in your backup could make wallet recovery impossible.
Once verified, store your recovery seed cards in a secure, private location. Consider using a fireproof safe or a metal backup solution for additional protection. Never store your seed phrase digitally, take a photo of it, or enter it into any website or application. For advanced backup strategies including Shamir Backup distribution, check our detailed backup and recovery guide on the blog.
Step 7: Set Your PIN Code
After backing up your seed, you will create a PIN code to protect physical access to your device. The Safe 7 uses a randomized touchscreen keypad where digit positions change with each entry attempt, preventing PIN capture through observation or screen recording. Choose a PIN that is at least 4 digits long. Longer PINs provide greater security, with support for up to 50 digits. Avoid obvious sequences like 1234, 0000, or your birthday. After 16 incorrect PIN attempts, the device performs a complete wipe to prevent brute-force attacks.
Step 8: Add Your First Cryptocurrency Account
With your wallet created, seed backed up, and PIN set, you are ready to add cryptocurrency accounts. In Trezor Suite, navigate to the accounts section and click “Add Account.” Select the cryptocurrency you want to manage, such as Bitcoin or Ethereum. Trezor Suite will create an account and generate your first receiving address. You can share this address with others to receive cryptocurrency, or use the send function to transfer assets from another wallet or exchange.
Congratulations! Your Trezor Safe 7 is now fully configured and ready to secure your digital assets. Explore the features page to learn about additional capabilities like passphrase wallets, Tor integration, and third-party wallet compatibility, or browse our blog for advanced security guides and best practices.
Comments
No comments yet. Be the first to share your thoughts!